
Mar
Peppermint Tea Dark Chocolate Brownies

Hmmm…tea or brownies? Tea and brownies? How about tea in brownies! If you love tea and you LOVE brownies (who doesn’t love brownies? ) this recipe is for you. Dense fudgy,dark chocolate laden brownies spiked with an earthy mint flavor reminiscent of your favorite cup of tea. It’s a chocolate and mint lovers dream. This special brownie was inspired by a recipe that I pulled out of a magazine years ago, filed away for future use and promptly forgot about. For ten years. Yup, the date at the bottom of the page says August/September 2002. Wow, I guess I should go through my recipe file more often. The funny part is that when I saved the recipe I didn’t know it had tea in it. I thought it was just your normal mint brownie made with peppermint extract. The main reason I saved it all these years was because of the pretty marbled white chocolate glaze that covered the brownie. It wasn’t until I read through the ingredients and spotted the tea that I realized what a special recipe this was. Despite my initial excitement, in the end I used the tea portion of the recipe and a modified version of the glaze, but not much else. The reason? It called for 2 1/2 sticks of butter and 2 cups of sugar!!! Granted, the recipe made a 9 x 13-inch pan of brownies which is pretty big, but even cut in half this recipe has more butter and sugar than any brownie would ever need. I have a brownie recipe from Cooking Light that I often use as a base for any brownie that I create. It’s thick and fudge-like with lots of chocolate flavor but only 5 tablespoons of butter and a mere 3/4 cup of sugar. Lots of indulgent flavor but no so many indulgent ingredients.
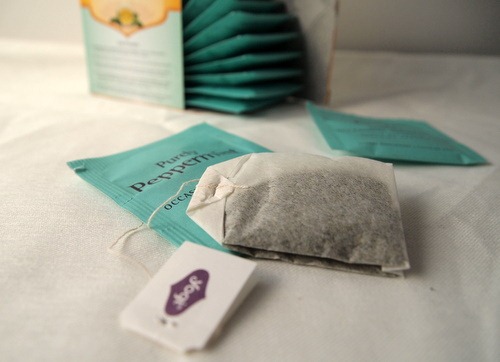
The tea I used was Yogi Purely Peppermint, but any herbal peppermint tea will do. I like the Yogi brand because they have a whole line of teas for specific aliments like Bedtime tea, Calming tea and my favorite Throat Comfort. I swear this is the best remedy for a sore throat out there. Beside their awesome teas, the other thing I love about the Yogi brand is that each tea bag comes with an inspirational message. And who couldn’t use a little inspiration with their tea…or their brownies?
The recipe instructions said to grind the sugar and tea leaves together in a food processor. Honestly, I’m not totally convinced that this step is necessary. My tea leaves were pretty well ground to begin with and I’m pretty sure that simply stirring the sugar and tea together would have produced the same result. But I did it anyway. I did it because when trying something new I‘m often struck with a debilitating fear that if I don’t follow the directions exactly I will be doomed to imminent failure. Let’s just say that in this case I took one for the team. I ground that sugar and tea so that you wouldn’t have to. Or go ahead and grind…who am I to tell you to break the rules? 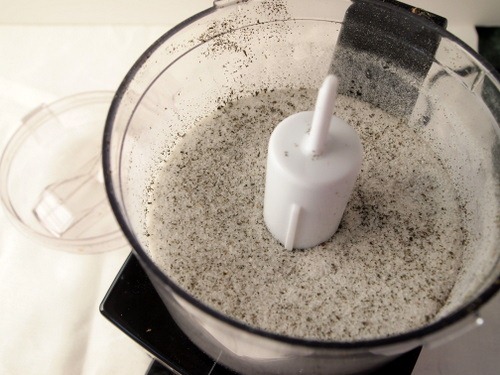
Grinding or no grinding, the end result is a thick, fudge-like batter laced with a refreshing minty aroma. 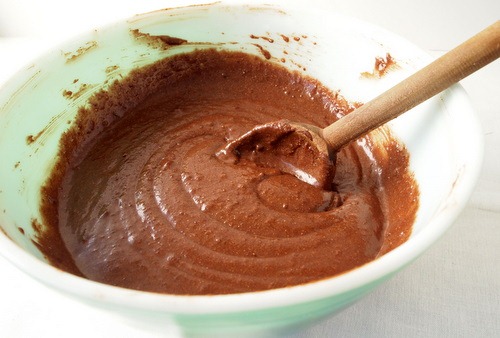
I had mine with what else… a mug of hot steaming tea.
Peppermint Tea Dark Chocolate Brownies
inspired by Cooking Light and Fine Cooking
Makes 16 small or 12 medium brownies
1/2 cup whole wheat pastry flour
1/2 cup white flour
1/2 cup unsweetened cocoa
1/4 teaspoon salt
1 teaspoon peppermint tea (from 1 teabag)
3/4 cup granulated sugar
5 tablespoons unsalted butter
2 ounces dark chocolate
1 teaspoon peppermint extract
3/4 cup milk
1 egg
2 egg yolks
2 ounces dark chocolate
1 tablespoon butter
1 ounce white chocolate
~1 tablespoon milk
green food coloring (optional)
1. Preheat the oven to 350ºF. Line an 8-inch square baking dish with parchment paper. Cut the paper long so it overhangs the edge of the dish on two sides. This will make it easy to remove the brownies before frosting.
2. In a medium bowl sift together the flours, cocoa and salt. In a food processor grind together the sugar and tea, add to the flour mixture. (This step can be skipped if you don’t have a food processor, just add the sugar and tea to the flour mixture and combine).
3. Place 2 ounces of dark chocolate and 5 tablespoons of butter cut into pieces in a small bowl. Microwave on high for about one minute in 20 second intervals. Stir between each interval. When the chocolate and butter are melted stir in the peppermint extract. Set aside to cool slightly.
4. In a small bowl whisk together the milk, egg and egg yolks. Add to the flour mixture and stir with a wooden spoon until completely incorporated. Fold in the chocolate mixture until just combined. The batter will be thick.
5. Pour into the prepared pan and tap on the counter to level. Bake for 25-30 minutes or until a wooden skewer inserted comes out clean. Place on a wire rack to cool. After about ten minutes pull the parchment edges and lift the brownies out of the pan. Let cool completely before frosting (about 1 hour).
6. When the brownies are cool melt the remaining 2 ounces of dark chocolate with 1 tablespoon of butter using the same method of 20 second intervals for about 1 minute total. Set aside and melt the white chocolate with a scant tablespoon of milk. Add more milk if needed until the white chocolate is the right consistency to drizzle over the brownies in a thin line. Add the food coloring one drop at a time until the desired green color is achieved. When both chocolates are melted pour the dark chocolate over the brownies and spread smooth. Drizzle the white chocolate over top in straight lines and drag a toothpick through the chocolate in alternating directions. Put the brownies in the fridge to cool for at least 2o minutes. Remove and cut into 12 or 16 pieces.
Feb
Chocolate Pavlova with Blood Orange Cream

I made you a dessert. A magnificent dessert. A dessert with chocolate and cream and tropical fruit. A dessert that will make your heart fill with joy and your mouth cry out for more. A dessert that is impressive to behold yet surprisingly simple to prepare. A dessert that is truly worthy of a holiday meant for love. ♥
You’re welcome.
If you’ve never had the pleasure of enjoying a Pavlova before, you’re in for a real treat. This meringue based dessert boasts an airy crisp crust and a chewy, almost marshmallow like center. It’s topped with whipped cream- I infused mine with a bit of fresh squeezed blood orange juice- and piled high with fresh fruits and berries. Pavlova is the perfect dessert to make for the one you love…or to ask the one you love to make for you. It does take a bit of time to prepare because the meringue needs to cook at a low temperature for about an hour and then cool slowly for another hour. But the hands on time is pretty minimal. And I promise…it is totally worth it.
Whipped egg whites and cocoa
Meet fresh fruit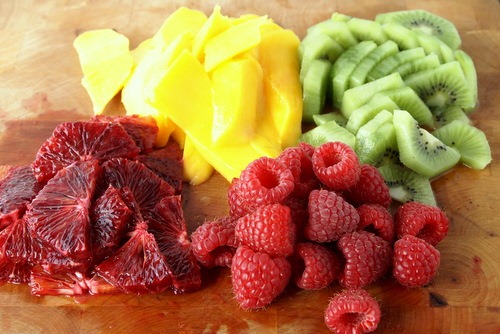
All together now
Chocolate Pavlova with Blood Orange Whipped Cream
barley adapted from Fine Cooking
4 large egg whites, room temperature
1/8 teaspoon cream of tartar
3/4 cup plus 2 tablespoons granulated sugar
1 tablespoon red wine vinegar
1 1/2 teaspoons cornstarch
1/4 cup unsweetened cocoa, sifted
1 cup heavy cream
2 tablespoons blood orange juice, from 1 orange
2 cups fresh fruit and berries ( I used 2 kiwis, 1 mango, 1 blood orange, and about 1/2 a cup of raspberries)
1. Preheat the oven to 350ºF. Cut a piece of parchment paper into a 9 inch circle and place on a baking sheet.
2. In the bowl of an electric stand mixer, or using a large bowl and an electric hand mixer, whip the egg whites and cream of tarter for about 30 seconds on medium speed until foamy. Slowly add 3/4 cup of sugar, cornstarch and vinegar. Raise the speed to medium high and whip for another 3 to 5 minutes or until the whites are glossy and hold stiff peaks when the beater is raised out of the bowl. With the mixer on low add the sifted cocoa and mix until almost combined. Turn off the mixer, scrape the sides of the bowl with a rubber spatula and finish mixing in the cocoa by hand until it is completely incorporated.
3. Slide the meringue out of the bowl and onto the parchment circle. Spread it out so it fills the entire circle and smooth the top a bit. Don’t worry about making it perfectly level, the ridges and bumps will give the finished product character.
4. Bake for 10 minutes and then reduce the heat to 300ºF. Bake for another 45 to 50 minutes until it cracks around the edges and puffs in the middle. Turn off the oven and open the door a crack. Leave the meringue in the oven to cool for 45-60 minutes. The slower it cools the less it will collapse in the middle. You can make the meringue the day before you plan on serving it and leave it in the oven to cool overnight.
5. Right before serving beat the heavy cream, blood orange juice, and remaining two tablespoons of sugar in a chilled bowl until soft peaks form. Mound the whipped cream on the meringue and spread it almost to the edge. Top with fresh fruit and serve immediately.
Nov
Pumpkin Almond Cheesecake

Finally, a pumpkin recipe. I mean it is almost December and I have yet to post a recipe with pumpkin in it- what blasphemy! I squeezed this one in just in the nick of time. December’s only a few days away which for me means Christmas decorations, holiday parties, homemade gifts, and best of all – baking projects, lots of baking projects. Most years I have a pretty ambitious list of holiday treats that I want to make, and most years I don’t even come close to making them all. Except for that one year when I made five different kinds of cookies in one day…never again! This year my list falls somewhere between completely manageable and a bit over- the-top. I have yet to decide exactly what I will be making, but I thought I would share with you a few of my ideas.
A couple years ago I made chocolate bark and it quickly became one of my favorite holiday confections. This year I stumbled across a recipe for Mint Chocolate Chip Bark that has my name all over it- hard to imagine that I’ll make it though the season without making this one.
Gingersnap Raspberry Sandwiches are a perennial favorite that combine the snappy ginger flavor of the holidays with the sweet summeriness of raspberries.
Chocolate Covered Pretzel Rods are simple and fun to make. I have made these before, but this year I am totally inspired by Sabrina’s creative approach.
I am so intrigued by this recipe for Candied Grapefruit Zest. It’s just the kind of treat that I would love if someone gave it to me… but I can’t decide if my friends and relatives will feel the same or think that a jar of grapefruit peels covered in sugar is just plain weird. Hmmm..I’ll have to give this one some thought.
Chances are that in the coming weeks I will add more to this list, and of course anything I make I will share here with you, but for now it’s still November and I need to tell you about this awesome pumpkin cheesecake. Cheesecake is not usually my first choice when it comes to dessert. Often times I find it a bit too dense and rich for my liking. This one fits neither of those descriptions though.The cake is comprised of a thin layer of almond cake with a light and fluffy cheesecake baked right on top. This combination not only cuts down on the overly rich flavor that cheesecake often has, but it also adds a subtle almond flavor that combines oh so perfectly with the pumpkin.
 Speaking of pumpkin- I did use fresh pumpkin in this recipe. It called for canned pumpkin as most recipes usually do, but I had a beautiful sugar pumpkin that had been sitting of my kitchen counter since sometime in October so it seemed like a shame not to use it. There’s a definite advantage to using canned pumpkin. First of all, it takes far less time to open a can of pumpkin than it does to roast one yourself. Second, pumpkin can be a bit stringy and if you want that same smooth texture as the canned version you are probably going to have to go through a few different steps of mashing and purèeing . Or you could just do what I did and simply mash it a few times with a potato masher – not worrying about achieving that perfect smooth texture. After all, it is fresh pumpkin and it deserves to retain a bit of its character. The end result was probably a bit lumpier than it would have been with canned pumpkin, and the batter was studded with bright orange bits of pumpkin, but when I served it at Thanksgiving not a single person complained (or even noticed). So canned or fresh, take your pick. But watch out for the canned version that has “pumpkin pie spice” already mixed in. Chances are this will mess with the flavor of the cake and you’re better off adding you own spices to a can of straight pumpkin.
 If the almond cake and pumpkin cheesecake aren’t enough to convince you that this recipe is one you will make again and again, the almond brittle will surely put you over the top. I am pretty much a sucker for anything with almonds in it and when you combine them with sugar and butter, oh man keep me away! This brittle is deceptively easy to make and even easier to eat right off the pan. Luckily we ended up with some extra pieces that were quickly devoured. Next time I am making two trays just so we can have lots of extra. Uh oh…I think I just came up with another holiday baking idea. Almond brittle recipe search here I come!
Pumpkin Almond Cheesecake
Slightly adapted from Cooking Light
Makes: 14 servings
Almond Cake:
6 tablespoons granulated sugar
¼ cup unsalted butter (1/2 stick), softened
1/8 teaspoon salt
4 ounces almond paste
2 large eggs
¼ cup cake flour
1 tablespoon dark rum
Cheesecake:
1 1/3 cup (11 ounces) 1/3 –less fat cream cheese
½ cup granulated sugar
Dash of salt
3 large eggs
1 vanilla bean, split lengthwise ( or 1 teaspoon extra-strength vanilla extract)
1 ¼ cups pureed unsweetened pumpkin (canned or fresh)
1/3 cup plain 2% reduced-fat yogurt
1/8 teaspoon ground ginger
Brittle:
½ cup sugar
1 ½ tablespoons water
1 ½ teaspoons light corn syrup
3 tablespoons sliced almonds
1 tablespoon unsalted butter
For serving:
Whipped Cream
Almond Cake:
- Preheat oven to 350º. Coat a 9-inch spring form pan with cooking spray.
- Combine the sugar, butter, salt, and almond paste in a large bowl. Beat with an electric mixer on medium speed about 3 minutes or until light and fluffy. Add the eggs, one at a time, beating well after each addition. Fold the flour and rum into the sugar mixture. Beat until well combined.
- Spread the batter evenly in the pan. Bake for 20 minutes or until a wooden pick inserted comes out clean. Cool completely in the pan on a wire rack ( do not remove the sides of the pan).
Cheesecake:
- Reduce the oven temperature to 300º.
- In a large bowl place the softened cheeses, sugar and salt. Beat with an electric mixer on medium speed until just blended. Add the eggs, one at a time, beating at low speed just until each addition is incorporated.
- Scrape the seeds from the vanilla bean (or measure out 1 teaspoon vanilla extract) and add to the cream cheese mixture along with the pumpkin, yogurt and ginger. Beat at low speed until just blended.
- Pour the cheesecake batter over top of the cooled almond cake. Bake for 1 hour or until the cheesecake center barely moves when the pan is touched.
- Remove the cheesecake from the oven and run a knife around the outside edge. Cool to room temperature on a wire rack. Cover and chill for 8 hours or overnight.
Brittle:
- Line a baking sheet with parchment paper.
- In a small saucepan mix together the sugar, water and corn syrup; bring to a boil. Cook without stirring for 5-7 minutes or until it turns a golden color. Remove from heat and immediately stir in the almonds and butter.
- Pour the sugar mixture onto the prepared baking sheet and tilt to spread in a thin layer. Let cool and break into 14 pieces.
Serving:
- Cut the cake into 14 pieces. Place a dollop of whipped cream on each piece along with a piece of brittle.
Subscribe by e-mail
Recent Posts
Tags
Archives
Tasty Reads

