
Feb
Chocolate Pavlova with Blood Orange Cream

I made you a dessert. A magnificent dessert. A dessert with chocolate and cream and tropical fruit. A dessert that will make your heart fill with joy and your mouth cry out for more. A dessert that is impressive to behold yet surprisingly simple to prepare. A dessert that is truly worthy of a holiday meant for love. ♥
You’re welcome.
If you’ve never had the pleasure of enjoying a Pavlova before, you’re in for a real treat. This meringue based dessert boasts an airy crisp crust and a chewy, almost marshmallow like center. It’s topped with whipped cream- I infused mine with a bit of fresh squeezed blood orange juice- and piled high with fresh fruits and berries. Pavlova is the perfect dessert to make for the one you love…or to ask the one you love to make for you. It does take a bit of time to prepare because the meringue needs to cook at a low temperature for about an hour and then cool slowly for another hour. But the hands on time is pretty minimal. And I promise…it is totally worth it.
Whipped egg whites and cocoa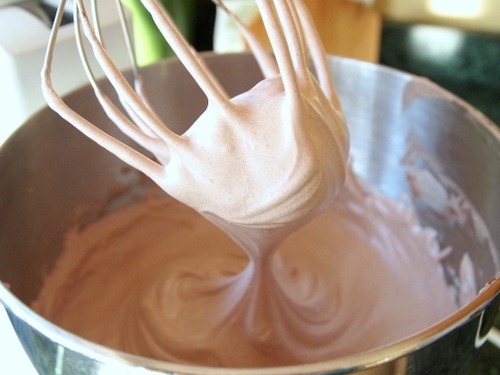
Meet fresh fruit
All together now
Chocolate Pavlova with Blood Orange Whipped Cream
barley adapted from Fine Cooking
4 large egg whites, room temperature
1/8 teaspoon cream of tartar
3/4 cup plus 2 tablespoons granulated sugar
1 tablespoon red wine vinegar
1 1/2 teaspoons cornstarch
1/4 cup unsweetened cocoa, sifted
1 cup heavy cream
2 tablespoons blood orange juice, from 1 orange
2 cups fresh fruit and berries ( I used 2 kiwis, 1 mango, 1 blood orange, and about 1/2 a cup of raspberries)
1. Preheat the oven to 350ºF. Cut a piece of parchment paper into a 9 inch circle and place on a baking sheet.
2. In the bowl of an electric stand mixer, or using a large bowl and an electric hand mixer, whip the egg whites and cream of tarter for about 30 seconds on medium speed until foamy. Slowly add 3/4 cup of sugar, cornstarch and vinegar. Raise the speed to medium high and whip for another 3 to 5 minutes or until the whites are glossy and hold stiff peaks when the beater is raised out of the bowl. With the mixer on low add the sifted cocoa and mix until almost combined. Turn off the mixer, scrape the sides of the bowl with a rubber spatula and finish mixing in the cocoa by hand until it is completely incorporated.
3. Slide the meringue out of the bowl and onto the parchment circle. Spread it out so it fills the entire circle and smooth the top a bit. Don’t worry about making it perfectly level, the ridges and bumps will give the finished product character.
4. Bake for 10 minutes and then reduce the heat to 300ºF. Bake for another 45 to 50 minutes until it cracks around the edges and puffs in the middle. Turn off the oven and open the door a crack. Leave the meringue in the oven to cool for 45-60 minutes. The slower it cools the less it will collapse in the middle. You can make the meringue the day before you plan on serving it and leave it in the oven to cool overnight.
5. Right before serving beat the heavy cream, blood orange juice, and remaining two tablespoons of sugar in a chilled bowl until soft peaks form. Mound the whipped cream on the meringue and spread it almost to the edge. Top with fresh fruit and serve immediately.
Feb
Maple Biscuits- Valentine’s Day Breakfast

Valentine’s Day is a stay at home holiday around here. We’re not dress up and go out to a fancy restaurant kind of people anyway, and the thought of trudging out on Valentine’s Day when the restaurants are all packed and the menu prices are sky high is frankly quite unappealing. Besides, I like to cook and Tim likes to eat what I cook… so it’s a win win for everyone. But that doesn’t mean I spend all day preparing a five course meal. Just the opposite in fact. Our Valentine’s Day meal is usually a simple affair. It’s more about favorite foods than fancy foods. This approach means that the Valentine’s Day meal really can last all day. I’m talking breakfast, lunch, dinner and dessert. Okay, maybe lunch is only a sandwich cut into a heart shape or soup with a cute note taped to the lid, but it still counts in my book. Valentine’s Day breakfast is the real deal though. Homemade biscuits, crispy bacon, fluffy eggs, and fresh melon! 
The best part of this Valentine’s day breakfast is how little time it took to make something that tastes sooo good. I probably only spent a total of 25 minutes on this meal and that includes the five to ten minutes it took me to dig out my heart shaped cookie cutters from the box I stashed them in last year.
First I made these simple maple biscuits. They would have tasted just as scrumptious round or square, but to make them Valentine’s Day appropriate I used a heart shaped cookie cutter.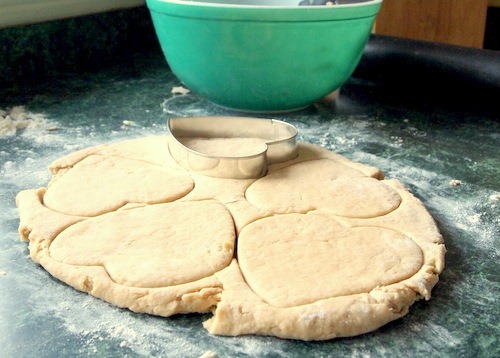
I always use the same recipe for “Basic Rolled Biscuits” from my tattered and stained copy of the Joy of Cooking. Depending on how I want the biscuits to taste, or what I am serving them with, I add or change the ingredients as needed. This time I was going for a slightly sweet flavor so I substituted out a 1/4 cup of milk for the same amount of maple syrup. The syrup gave the dough a faint brownish hue and when I pulled them out of the oven they had deepened to the most gorgeous golden brown color. 
You can certainly eat these sweet feathery biscuits on their own. I couldn’t resist the aroma of maple mixed with butter and I bit into one straight out of the oven, burning the tips of my fingers in the process. As I took a bite the soft, buttery dough melted in my mouth and the complex sweetness that only comes from real maple syrup made my taste buds step up and take notice. I could have easily consumed them all this way, leaning against the counter and licking my scorched fingers, but since this was supposed to be a meal for two I somehow summoned up enough self control to resist scarfing down the entire batch. Instead I sliced the biscuits in half and layered them with a few slabs of crispy bacon and a spoonful of scrambled eggs. 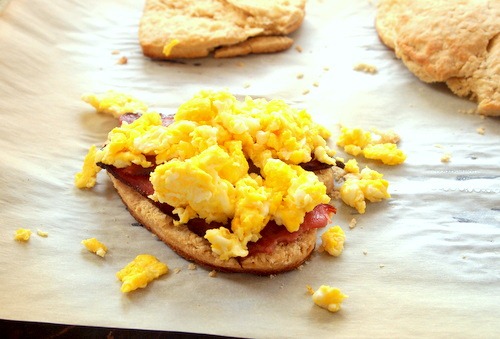
I topped them with the second half of the biscuit and there you have it- a Valentine’s Day breakfast sandwich!
We ate ours with heart shaped melon and fresh OJ…mmmm.

Maple Biscuits
Adapted from the Joy of Cooking
Makes: 6-8 five inch heart-shaped biscuits
1 cup all-purpose flour
1 cup whole wheat flour
2 1/2 teaspoons baking powder
1/2 teaspoon salt
6 tablespoons cold unsalted butter, cut into pieces
1/2 cup milk
1/4 cup maple syrup
1. Preheat the oven to 450ºF. Line an ungreased baking tray with parchment paper.
2. In a medium bowl whisk together the dry ingredients, flour through salt. Drop the cold butter into the flour mixture and toss them around a bit to coat with flour. Using a pastry blender or two knives cut the butter into the flour until the butter pieces are roughly the size of peas.
3. In a small bowl whisk together the milk and maple syrup until completely combined. Pour the milk and syrup into the flour mixture and stir with a wooden spoon until it just starts to form a dough. Using your hands form the dough into a ball and knead it gently in the bowl until all the dry or loose pieces are incorporated.
4. Place the dough on a lightly floured surface and roll out to 1/2 inch thick. Cut the heart shapes out and place them on the parchment covered baking sheet. You will have to re-roll the scrapes if you are using a 5 inch cutter and want more than 6 biscuits. Be careful not to re-roll them too many times though or the biscuits will be tough instead of fluffy.
5. Bake for 10-12 minutes or until golden brown on top.
Feb
Sweet Potato and Almond Croquettes

I could eat sweet potatoes everyday. I could eat them baked, mashed, boiled, or fried. I could eat them drizzled with honey, topped with sausage, or baked into bread. As far as I am concerned sweet potatoes are the perfect food. They’re healthy, they’re tasty, and they can be prepared in an infinite number of ways. My default sweet potato recipe is to cube them, toss with some olive oil, salt, cayenne, a pinch of rosemary and roast until soft in the middle and crisp on the outside. These sweet potato croquettes are kind of like a more sophisticated, more refined, version of this dish. Soft, pillowy mashed spuds are mixed with goodies like scallions and ground almonds then rolled into balls and dipped in crunchy panko crumbs. The best part? There’s cheese! Traditionally potato croquettes are fried. I considered taking this route, I really did. I figured if there was was ever a time to eat fried foods, the week of the Super Bowl was it. In the end though, I couldn’t do it. Partly because I felt guilty about the prospect of vilifying these healthy little potato balls by subjecting them to a hot oil bath, but mostly because it just seemed like too much work. And too much mess, and too much potential for failure, and burning myself. So I baked them instead…and they were wonderful!
Sweet Potato and Almond Croquettes
Makes about 16 two-inch balls
1 pound sweet potatoes, peeled and cubed
1 tablespoon butter
2 tablespoons scallion, minced
1/2 cup cheddar cheese, grated
pinch of cayenne pepper
pinch of nutmeg
1 teaspoon salt
1/2 teaspoon black pepper
1/2 cup almonds
1/4 cup whole wheat flour
1 egg
1 1/2 cups panko breadcrumbs
1. Place the cubed sweet potatoes in a medium pot. Fill with enough water so the potatoes are almost submerged and bring to a boil. Reduce the heat to a simmer and partially cover. Cook for about 15 minutes or until the potatoes are easily pierced with a fork.
2. Remove from heat, drain and place in a large bowl. Mash the potatoes using a potato masher until smooth. Add butter, scallions, cheese, cayenne, nutmeg, salt and pepper. Mix thoroughly. Taste and add more salt if needed. Pulse the almonds in the food processor until they are finely ground. Add to the potato mixture along with the flour and egg. Stir until the egg is completely mixed into the other ingredients. Place in the fridge for about half and hour to cool (or if you’re impatient like me stick it in the freezer for about 10 minutes). You know the potato mixture is cold enough when you can form it into a ball.
3. Preheat the oven to 375ºF. Place the panko in a wide shallow bowl. Form the chilled potato mixture into balls and roll in the panko. I found that the best method for a nice crispy crust was to roll it once pressing the panko into the potato and then roll again to coat the outside.
4. Place the potato balls on a baking sheet coated with cooking spray and bake for 30 minutes. The outside will be lightly brown and crispy. Serve warm.
Subscribe by e-mail
Recent Posts
Tags
Archives
Tasty Reads

