
Dec
Peanut Butter Cranberry Dog Treats

Yup, you read it right… dog treats. What? You don’t think dogs deserve homemade treats too? Well my dog definitely does. In fact, I think he expects them. Oh, you’re making cookies…are they for me? (You have to read this sentence in a dopy dog voice) Many years ago I used to make my own dog treats all the time. I made this really complicated recipe that included things like bone meal, protein powder and all sorts of other hard to find and expensive ingredients. Then I discovered Buddy Biscuits bake at home dog treats and all that difficult ingredient collecting went out the window. Buddy Biscuits are kind of like Betty Crocker brownie mix for dogs- except they use really healthy ingredients- and the box comes with a dog bone shaped cookie cutter! 
I got of out of the habit of making them though, and it’s probably been at least 3 years since I made any sort of homemade dog treat. Well, lucky for my dog about a month ago I stumbled upon this recipe for Cranberry Oat Dog Treats and decided that it was time to give them another try. Since I already had quite a few baking projects this week, and I’ve been a a roll with the human treats, it seemed only fitting that I should expand my baking repertoire to include something special for my canine friends.
This is Phineas waiting patiently for his treat
And here he is eating his treat – he’s very gentle for such a big guy
I didn’t end up following the recipe that I had discovered exactly, in fact I didn’t really follow it at all. Instead I found another recipe from this website that was similar except that it included peanut butter. I ended up with a kind of combination of the two recipes using peanut butter and cranberries. I had my heart set on including the cranberries because I really liked the way they made the treats look. Also, dogs need antioxidants too- right?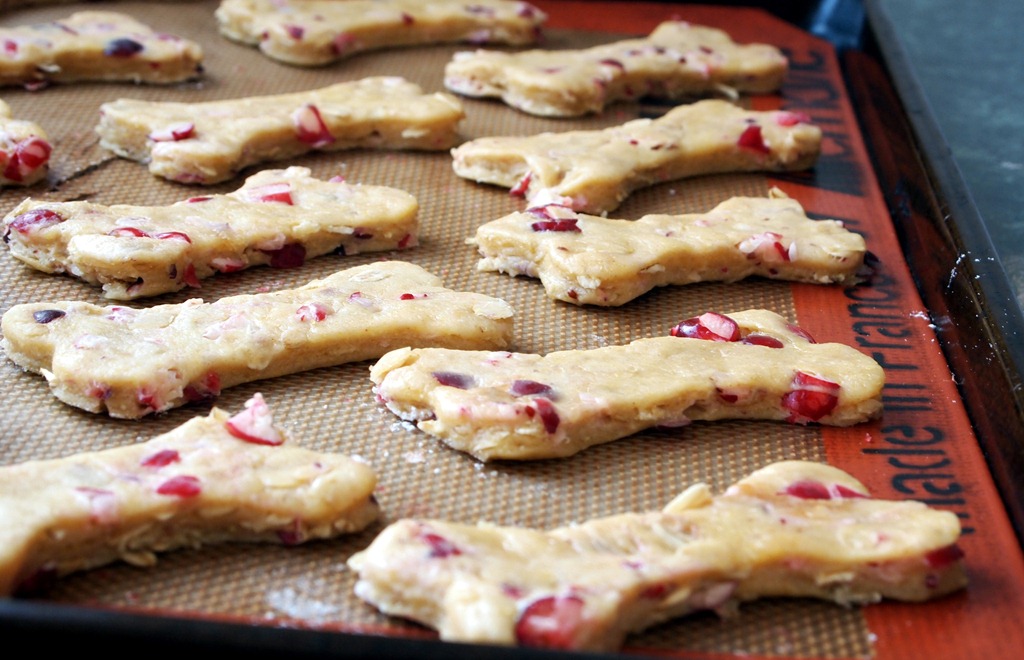
 I’ll be back in a few days
with more treats for
humans but until then
give your dog some
love and make it a
special homemade
holiday this year.
Oh, and one final note- a certain non-canine member of my household thought these looked good enough to eat. The verdict? Dry and bland…very dry and bland. For dogs only!
Peanut Butter Cranberry Dog Treats
Inspired by Doggie Dessert Chef and Bullwinkle.com
Makes: about 3 dozen 2-inch cookies
1/2 cup water
1/2 cup canola oil
2 eggs
3 tablespoons peanut butter
2 teaspoons vanilla extract
1 cup fresh cranberries, roughly chopped
2 cups all-purpose flour
1/2 cup oats
1/2 cup cornmeal
1. Preheat the oven to 400ºF.
2. In a medium bowl combine the water, canola oil, eggs, peanut butter and vanilla. Set aside.
3. In a large bowl whisk together the flour, oats and cornmeal. Make a well in the center of the flour mixture and pour in the wet ingredients. Stir well to combine. Fold in the chopped cranberries.
4. On a well floured surface roll the dough out to about a 1/3 of an inch thickness. Using your dog’s favorite cookie cutter shape, cut out the treats and transfer to a baking sheet.
5. Bake for 20 minutes. Turn off the oven and leave the treats in there, allowing them to cool and crisp. Store in an airtight container.
Dec
Chocolate-Peppermint Swirl Cookies

Cookie time! I wouldn’t normally make cookies two weeks in a row, but it is the holidays after all. Also, after last week’s cooking mishaps I had to redeem myself somehow. It’s true that I had my heart set on making those pesky candied grapefruit peels for holiday gifts, but since the result was nothing short of disastrous I decided to go back to something I know I can make- cookies!
Let me tell you, this recipe did not disappoint. I mean really how could it? Anything that combines melted chocolate with crushed candy canes is bound to be amazing. Chocolate and peppermint is not only a super delicious combination of sweet and sweeter, but something about it just screams holiday time- perfect for cookies that I want to give as gifts. I’ve made other variations of these swirl cookies in the past and I have to say that this one wins the prize. The recipe that inspired this cookie is Martha Stewart’s Chewy Coconut-Chocolate Pinwheels. These cookies were part of my holiday baking line-up for many years and while they are pretty tasty, next to this new version they’re down right boring! The addition of crushed candy canes in the sugar cookie dough creates a cookie that manages to pull off both a chewy and crunchy texture at the same time. Combine this with a thick gooey layer of melted chocolate and you have a winner.
Despite their impressive appearance, these cookies are actually quite simple to make. The hands on baking time is pretty short, but you do need to chill the dough twice so don’t try and make these an hour before you want to bring them to a party. I’ve even made you a handy step-by-step photo guide (my first ever) to walk you through the process- happy baking!
Start by crushing the candy canes…I used a hammer wrapped in plastic
Make the dough – I love the colorful bits of cane mixed in there
Roll out the dough and trim the edges to form a rectangle
While the dough is chilling melt some chocolate…try not to eat it out of the bowl!
Spread the chocolate on the chilled dough
Rolllll it up….
Wrap the cookie log and chill again
Slice and bake
Fresh out of the oven
Peppermint-Chocolate Swirl Cookies
Inspired by Martha Stewart’s Chewy Coconut-Chocolate Pinwheels
Makes 2 dozen cookies
1/2 cup candy canes. crushed
2 cups unbleached all-purpose flour
1/2 teaspoon baking soda
1/4 teaspoon salt
9 tablespoons unsalted butter, room temperature
1 cup granulated sugar
1 egg
1 1/2 teaspoons peppermint extract
6 ounces bittersweet chocolate
1/2 cup sweetened condensed milk
1. In a medium bowl whisk together flour, baking soda and salt. Set aside. In a large bowl fitted with an electric mixer, or using a hand beater, cream 8 tablespoons of butter and the sugar until fluffy. Add the egg and peppermint extract; mix until combined. With the beater on low, add the flour in two additions. Fold in the crushed candy canes and mix until just combined.
2. Roll the dough out between two pieces of parchment paper until it resembles an approximately 10 x 15- inch rectangle. Trim the edges to make a neat rectangle. Place the dough on a baking sheet and refrigerate for 1 hour.
3. About 10 minutes before you take the dough out of the fridge, melt the chocolate. In a heat proof bowl set over a simmering pot of water melt the remaining 1 tablespoon of butter with the chocolate; stirring occasionally for about 3-4 minutes. Remove from heat and stir in the sweetened condensed milk. Set aside to cool slightly.
4. Remove the dough from the refrigerator and peel off the top layer of parchment. Spread the chocolate evenly over the dough rectangle. Using the bottom piece of parchment roll the dough starting at the short end. Wrap the dough and chocolate log tightly in plastic wrap and return to the refrigerator for another hour.
5. Preheat the oven to 350º. Have ready two baking sheets lined with parchment paper or silicone baking mats.
6. Remove the cookie log from the refrigerator and cut into 1/4-inch thick slices. Bake for 10-12 minutes rotating the sheets once halfway through the baking time. The edges of the cookies will be lightly browned. Transfer to a wire baking rack to cool.
Dec
Split Pea Soup & Oat Cornmeal Bread

Something’s not quite right this week. All I’ve managed to accomplish is one disaster after another. The week started off with two kitchen mishaps and ended with yet another broken phone. Yeah I know, there’s only ten days left till Christmas and I could start making excuses about the holidays and stress, fighting the crowds at the mall..blah,blah,blah. Except that I find the holidays far more exciting than stressful and I don’t shop at the mall (It’s called the Internet- you might have heard of it). So what could be the problem? Full moon? Nope that was last week. My body’s a bit off because I had a pesky cold for two weeks which then turned into strep throat? Nope, also last week. A grand conspiracy stirring in the universe to mess with my normally organized and peaceful existence?- that must be it.
It all started with the grapefruit. About a month ago I came across this recipe for candied grapefruit peel that I just couldn’t get out of my mind. Those sugar coated bright orange peels called out to me in a way that was impossible to resist. All sane and rational thoughts (like who would want to eat these) flew out of my head and before I knew it I was peeling, slicing and simmering a big ol’ pile of grapefruit peels. I even had the perfect packaging all planned out. A small pint sized glass jar filled with the sugary strips and adorned with a green ribbon and carefully hand lettered label. The whole thing would be just so Martha. Except it wasn’t.
After the two hours of simmering in a simple syrup the peels looked great. As instructed I set them on a rack to dry before rolling them in sugar. Well, a few hours later they were still wet so I decided to let them dry overnight- couldn’t hurt right? Wrong..oh so wrong. The next morning they had shriveled and curled up to the point of no return. There was no way these babies were ever going to look good, even a thick sugar coating couldn’t save this disaster. I couldn’t even take a picture, it was that ugly.
It wasn’t a total loss though. I mean we did eat the grapefruit, and while the peels were simmering for two hours I made a batch of the most delicious Cranberry-Nut Mini loaves with Flax that I have ever tasted. Except that I dropped them on the floor. Let me clarify, I dropped them on the floor while they were still hot and the cute little breads just fell to pieces. Oh, and I forgot to mention that the spot where I dropped them- right next to the dog’s food bowl. I did manage to salvage some of the bigger pieces, and after dusting them off a bit (ewww!) I discovered just how amazing this bread was. Which of course made me even more upset because who wants to drop awesome bread on the floor. I will be making another batch of these breads very soon but for now you should visit this blog for the recipe and inspiring pictures.
So what’s a girl to do to salvage this week of disasters? I decided that the solution to my woos would be a nice big pot of the ultimate comfort food- soup. Soup is a pretty hard meal to mess up (unless you drop it on the floor – come on, I know you were thinking it). I wanted something hearty and healthy that didn’t require a ton of ingredients, hours of chopping or any sort of fancy culinary skills. So I pulled out my trusty Soup Makes the Meal cookbook by Ken Haedrich and flipped through the pages until I came upon the perfect recipe. He calls it No Bones About it Split Pea Soup. I just call it Split Pea Soup. I choose a ham free recipe not because I have anything against ham, in fact I think this soup is pretty fantastic with a bit of ham sprinkled on top, but as I didn’t happen to have a ham bone lying around this seemed the way to go. This is a really simple recipe that I have adapted a bit to suit my own tastes. Feel free to play around with it and add different spices if you so desire. And if you’re one of those people who can’t imagine pea soup without the ham bone (or if you happen to have on lying around) just throw it in the pot with everything else. I also made a quick and hearty bread to go with my soup because soup without bread is like a fish without water. This is a pretty dense bread that is amazing when dipped in the soup and just as yummy smeared with a bit of butter. Enjoy.
Split Pea Soup Sans Ham
adapted from Soup Makes the Meal by Ken Haedrich
Serves:6-8
1 tablespoon olive oil
1 large onion, chopped
3 celery ribs, chopped
2 garlic cloves, minced
1 1/2 cups dried split peas, rinsed and picked
5 cups water
2 cups chicken or vegetable stock
1 potato, peeled and cubed
1 teaspoon Herbs de Provence (or just dried thyme)
1 1/2 teaspoons salt
1/2 teaspoon freshly ground black pepper
1 teaspoon Spanish smoked paprika
Optional toppings:
Cooked ham, diced
Cheddar cheese, shredded
Sour Cream
Italian Parsley
1. In a large Dutch oven or stock pot heat the olive oil over medium heat. Add the onion and celery and cook until soft and translucent, about 8-9 minutes. Add the garlic during the last minute. Stir in the peas, water and stock. Bring to a boil, stir and reduce heat to low. Keep the soup at barely a simmer over low heat for 1 hour, stirring occasionally.
2. After 1 hour, raise the heat a bit and add the potato and Herbs de Provence. Partially cover the soup and simmer for at least an another hour and a half or until the peas and potato are soft. Remove from the heat and add the salt, pepper, and paprika.
3. Working in batches, purée the soup in a food processor until smooth. Add more salt and pepper if needed. Serve hot with you favorite toppings.
Oat & Cornmeal Raisin Bread
1/2 cup rolled oats (not quick cooking)
2 cups buttermilk
1 egg, lightly beaten
3 tablespoons honey
1/4 cup canola oil
1 cup yellow cornmeal
1/2 cup whole wheat flour
1/2 cup unbleached white flour
1 teaspoon baking powder
3/4 teaspoon baking soda
1/2 teaspoon salt
3/4 cup raisins
1. Preheat the oven to 400ºF. Grease a 9×5-inch loaf pan. Set aside
2. In a small bowl whisk together the oats, buttermilk, egg, honey and oil.
3. In a large bowl combine the cornmeal, flour, baking powder, baking soda, and salt. Make a well in the center of the ingredients and pour in the liquid mixture. Stir until just blended.Fold in the raisins and pour into the prepared pan.
4. Bake for 35 minutes or until the top is golden brown and a wooden tester inserted comes out clean. Transfer to a wire rack and let cool for about 15 minutes before slicing.
Subscribe by e-mail
Recent Posts
Tags
Archives
Tasty Reads

