
May
Roasted Strawberry and Spinach Salad

I’ve eaten this salad 3 times this week…so far. That’s right- 3 times I’ve devoured a great big bowl of spinach smothered in balsamic dressing and topped with flavor-bursting roasted strawberries and crunchy bits of toasted almonds. I just can’t get enough. This was the first (but definitely not the last) time I roasted strawberries. I’ve roasted other fruits in the past. Things like pineapple, peaches, apples, and even lemons, but never strawberries. Let me just say right not that you HAVE to try this. As soon as the first bite hit my mouth I knew I was hooked and my mind began frantically plotting more ways to enjoy these soft and juicy amazing little fruits.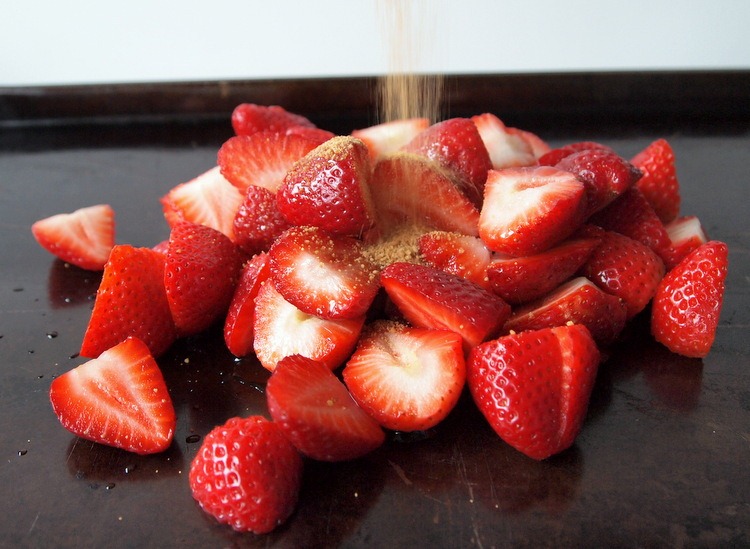
Roasting strawberries is simple. Well, roasting anything is pretty simple but strawberries are especially easy because they only need 10 minutes in the oven to achieve perfection. A drizzle of olive oil, a sprinkle of sugar, a dash of salt and pepper and in the oven they go.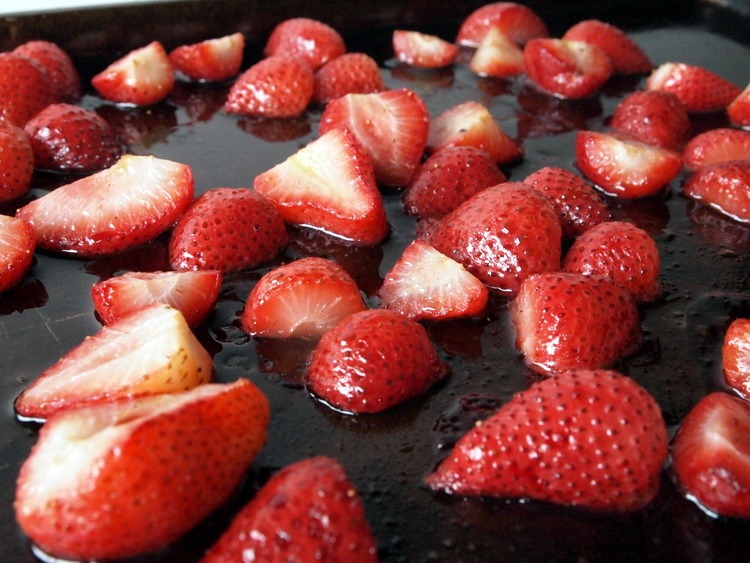
Ten minutes later and voilà! Roasted strawberries. Soft but not mushy, sweet but not sugary and perfect in combination with a big ol’ pile of tender baby spinach leaves. The best part about this salad? It only takes ten minutes to make! While the strawberries are roasting you whip up a simple vinaigrette, toast some almonds and wash a bunch of spinach. Spinach goes in bowl, strawberries and almonds go on top, vinaigrette is generously drizzled over everything…and then you eat. Could it be any easier? 
Roasted Strawberry and Spinach Salad
adapted from Williams Sonoma
Serves:6
1 pound strawberries, hulled and cut in half
5 tablespoons olive oil, divided
4 teaspoons sugar, divided (I used coconut sugar)
salt and pepper
3 tablespoons balsamic vinegar
2 tablespoons orange juice
1 cup slivered almonds, toasted
9 cups baby spinach leaves
optional: 5 ounces Romano cheese, shredded*
1. Preheat the oven to 400ºF. On a large rimmed baking sheet pile the strawberries, 2 tablespoons olive oil, 2 teaspoons sugar and a sprinkle of salt and pepper. Toss and spread in a single layer. Roast for ten minutes.
2. While the strawberries are roasting make the vinaigrette. Whisk together the balsamic vinegar, orange juice, remaining 2 teaspoons of sugar, a dash of salt and a few grinds of pepper. Slowly add the last 3 tablespoons of olive oil while you are whisking.
3. You can serve this salad two ways. If you have a crowd of people and anticipate eating it all at once simply pile all the spinach in a bowl, top with berries and almonds, drizzle with dressing, toss and serve immediately. Or, if you’re like me and want to eat this salad 3 times in 2 days it’s best to keep all the ingredients separate and make individual servings as you need them. This way the spinach doesn’t get soggy.
*The original recipe called for a bit of Romano cheese. While I love the idea of salty cheese combined with sweet berries I kind of forgot to add it the first time, and the second time decided that I liked it just fine without the cheese and left it out on purpose. By all means though- add the cheese if you want.
Apr
Almond Butter Dark Chocolate Cookies
 Rainy days are made for baking cookies… and eating cookies. Or to be exact, eating three cookies in a row plucked straight from the still hot baking tray. What…no, I would never do that! I always wait patiently for the cookies to cool before stuffing them in my mouth. Ha! Yeah right, I mean does anyone wait? Seriously, the person who can resist devouring cookies still warm from the oven is clearly a better person than me. There’s just something about the thrill of burning my fingertips on gooey melted chocolate and the roof of my mouth on piping hot dough that I simply can’t resist. Come on, what’s a few burned fingers when what you get in exchange is mouthful of amazing almond butter cookie mixed with a generous bite of dark chocolate? Clearly the reward far outweighs the sacrifice.
 These cookies did a fine job of brightening up what was otherwise a dreary rainy day. They also gave me an excuse to try out a new kind of sugar I recently discovered. It’s called Coconut Sugar and is made from the sap which drips from coconut flower blossoms! Pretty cool huh? This is a traditional sweetener that’s been used for years in southeast Asia. The process for making the sugar sounds similar to how we make maple syrup. A little cut is made in the blossom from which the sap flows out and is collected in bamboo containers. The sap is then heated over a long period of time during which the moisture evaporates until a thick paste forms. Sometimes you can find coconut sugar sold in this paste-like form, but it seems that the most common type has been cooked even further until it becomes a granulated sugar.This is the type I bought. It looks kind of like a cross between turbinado and brown sugar.
 Coconut sugar tastes pretty similar to plain white cane sugar except that is has a hint of caramel flavor reminiscent of brown sugar. I think you could successfully use it as a substitute for either white or light brown sugar. There’s several reasons why coconut sugar is all the rage these days. First, because it’s minimally processed (especially the brands labeled organic) and contains no additives or bleaching products. Second, it has trace amounts of minerals like zinc and iron. And third, it boasts a low glycemic index which is a safer alternative for those with diabetes because it doesn’t cause such a rapid spike in blood sugar. Of course, like every product that claims to be a “healthier” sweetener there are questions popping up about the true nature of this sugar and just how low the glycemic index really is. It’s my opinion that all sugars should be used sparingly regardless of what the GI number is, but what really draws me to coconut sugar is the fact that it hasn’t been processed to death or treated with bleach and other nasty things that I would rather not put in my body. For that same reason my favorite sweeteners lately have been honey and maple syrup. The problem is that it can sometimes be hard to use these liquid sweeteners in recipes that call for dry sugar. In these cases coconut sugar seems like a great alternative.
Speaking of maple syrup…I couldn’t resist including just a little. I suspected that the maple flavor would be the perfect compliment to the almond butter and the teaspoon of cinnamon that I added. Guess what? I was right.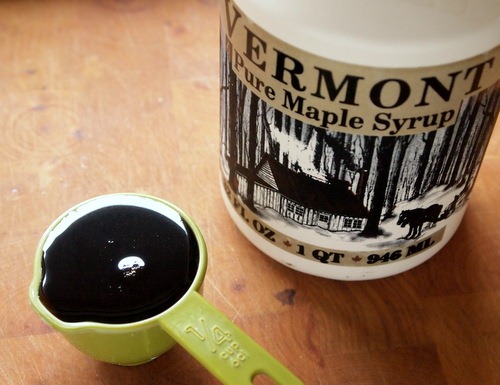
This was my first time making almond butter cookies. Well, actually my second time because the first batch, while tasty, came out with a texture more like cake than a cookie. The solution was more butter-like twice as much butter. I had this theory in my head that since I was including almond butter I could use less regular butter. Not true. Almond butter does not act the same as butter made from a dairy product, at least not in these cookies. The almond butter has a very mild flavor- in fact, I couldn’t detect any almond flavor in these cookies at all. There is a slight nutty taste that is sooo good along with the cinnamon and maple flavors. This amazing combo makes these cookies pretty irresistible in my book.  I also added lots of chocolate chips…because I could.
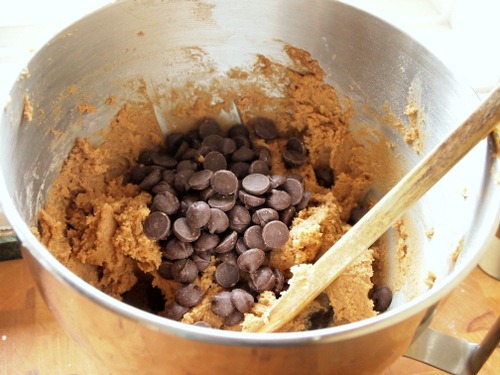
These are lumpy looking cookies that don’t spread much as you bake them. I smashed the first batch down with a fork like you would with traditional peanut butter cookies, but for this batch I decided to leave them as is in all their lumpy glory. If you want a thinner cookie go ahead and give them the fork treatment but be sure to reduce the baking time by a few minutes. Yum!
Yum!

Almond Butter Dark Chocolate Cookies
makes: 2 dozen cookies
1 1/2 cups white whole wheat flour or whole wheat pastry flour
1 teaspoon baking powder
1/4 teaspoon salt
1 teaspoon cinnamon
1/2 cup coconut sugar or light brown sugar
1/4 cup maple syrup
8 tablespoons (1 stick) unsalted butter, room temperature
1/2 cup raw almond butter
1 egg
3/4 cup dark chocolate chips
1. Preheat oven to 350ºF. Line two cookie sheets with parchment paper or silicone baking mats.
2. In a medium size bowl whisk together the flour, baking powder, salt and cinnamon.
3. In a large bowl, or in a stand mixer bowl, beat together the sugar, maple syrup and butter until fluffy with the beater on high. Add the almond butter and egg and continue mixing on medium high until completely incorporated. Add the flour mixer in two parts with the mixer on medium-low. Beat until just combined. Using a wooden spoon fold in the chocolate chips.
4. Drop heaping tablespoons of dough on the prepared baking sheets. The cookies will not spread very much so they only need a little space in between. I was able to fit 12 cookies on each 9×11-inch baking sheet.
5. Bake for 12-14 minutes, rotating the sheets once if they are on different levels of the oven. The tops will the slightly browned. Cool on wire baking racks.
Apr
Grilled Cheese with Arugula + Roasted Red Pepper Spread

Today I’m celebrating National Grilled Cheese month. Actually, as it turns out I’ve already celebrated it several times this month and I didn’t even know it. That’s because I just found out about this month-long celebration of melted cheese a few days ago. I’ll be the first to admit that I’m not one of those food bloggers who’s organized enough to post recipes for each (okay any) of the food holidays, but this was one I couldn’t let pass by. Already this year I’ve missed National Popcorn Day, National Peanut Butter Lover’s Day, National Chocolate-Covered Nut Day, and just yesterday National Garlic Day. No, I’m not making these days up. In fact, there is a National Some-Sort-Of-Food Day for every day of the year. Seriously. You would think since every day is a food holiday I could get it together just once to post something relevant. Nope, not happening. Fortunately for me, some food holidays last the entire month. April is also National Florida Tomato month and Soy Foods month…hmmm, think I’ll stick with grilled cheese. It’s unclear who decides these holidays. I wonder who declared February National Fiber Focus month, or June 5th Jelly-Filled Donut Day…and why? I guess it doesn’t matter because celebrating food is always a good thing. Even if it is something boring like fiber, or kind of gross like Weinerschnitzel day (September 9). 
I happen to love any dish that features melted cheese as a main ingredient, so an entire month of grilled cheese sounds good to me. Too bad I only have ten more days to celebrate. Speaking of celebrating, I think spring is finally here to stay so I thought it would be a good time to share some of the other things I love about April besides bread and cheese…
Tulips & Daffodils
Early purple flowers called Pulmonaria (ugly name, pretty flower) and wild Yellow Toad Lilies
Phineas playing in the river
And Arugula…grown right here in Vermont. In fact, grown right down the road at Three Crows Farm. Gotta love spring! It was this fresh Arugula that provided the inspiration for my grilled cheese. The slightly spicy flavor of this crisp spring green pairs perfectly with creamy, nutty fontina cheese. 
I also added a roasted red pepper spread to the mix. If you’ve never made your own red pepper spread, or even roasted red peppers, you’re in for a treat. Not only does this spread taste amazing, but it is sooo easy to make. The peppers are broiled for about ten minutes until blistered and black then steamed under plastic wrap. Slide the skins off and puree with garlic and olive oil. That’s it. Couldn’t be simpler.

Hearty whole wheat bread, thick slices of cheese, a slathering of red pepper spread, and a generous handful of arugula- now that’s what I call a grilled cheese!
A stack of cheeses…all grilled up.
Grilled Cheese with Arugula + Roasted Red Pepper Spread
Makes 2 sandwiches + extra spread
2 sweet red peppers
2 cloves garlic, peeled
1 tablespoon + 1 teaspoon olive oil, divided
salt and freshly ground pepper
4 pieces whole wheat bread
4-6 ounces Fontina cheese, sliced thin
2 large handfuls arugula
1. Preheat the oven to broil and line a broil pan with aluminum foil (for easy clean up). Wash the peppers well and remove any stickers. Cut them in half and remove the ribs and seeds. Place the peppers cut side down on the lined broil pan and brush with 1 teaspoon olive oil. Broil for about 10 minutes until the skin is blistered and black. Remove from the oven, place in a bowl and cover tightly with plastic wrap. Let sit for 20 minuets. Remove the peppers from the bowl and peel off the skin. It should come off easily but rub any stubborn spots with your hand or a paper towel.
2. Chop each pepper into quarters and place In a food processor along with the garlic cloves and remaining 1 tablespoon olive oil. Pulse until a paste forms. Add salt and pepper to taste. You will have about 2 cups of spread. Save the leftovers in an airtight container in the refrigerator for up to a week.
3. Heat a griddle or grill pan over medium-high heat. Brush each piece of bread with a little butter or oil. Layer 2-3 ounces of cheese (depending on the size of your bread), a couple tablespoons of roasted red pepper spread, and a handful of arugula on two pieces of bread. Top with remaining bread pieces and press in place.
4. Cook for about 3-4 minutes on each side until the bread is toasted and the cheese is melted. Serve immediately.
Subscribe by e-mail
Recent Posts
Tags
Archives
Tasty Reads

